Easy Halloween Rice Krispie Treats
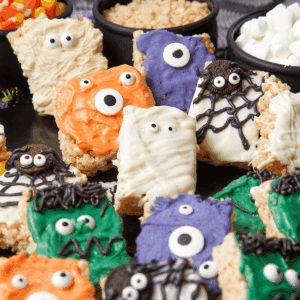
One pan of Halloween Rice Krispie treats, four spooky designs: mummies, Frankensteins, spiders, and monster eyes. No oven, 16 squares, and easy enough for kids to decorate their own.
Equipment
Ingredients
- 1 batch Rice Krispie Treats cut into 16 squares
- 2 cups white candy melts melted, divided
- ½ cup green candy melts melted
- ½ cup black candy melts melted or black icing
- ½ cup orange candy melts melted, or white candy melts + orange gel food coloring
- ½ cup purple candy melts melted, or white candy melts + purple gel food coloring
- Candy eyeballs about 40 total, mix sizes
- 4 mini Oreo cookie halves use one wafer per spider
- Black jimmies optional

Instructions
- Cut Rice Krispie Treats into 16 squares. Place on parchment-lined tray.
- Melt the candy melts: Work on one design at a time, since each only needs 1–2 colors. Place wafers in a microwave-safe bowl and heat in 20–30 second bursts, stirring between each, until smooth. If the melts seize or thicken, stir in about 1 teaspoon of coconut oil per cup of wafers to thin them back out.
- Mummies (4): Spread melted white candy melts across the top of each Rice Krispies treat. Transfer some into a piping bag fitted with a Wilton #3 tip (or a zip-top bag with a tiny corner snipped). Pipe thin, uneven lines across each square to create bandages. Add 2 candy eyeballs before the melts set.
- Frankensteins (4): Spread melted green candy melts to cover the top of each Rice Krispies Treat. Transfer black melts into a piping bag with a Wilton #3 tip (or a zip-top bag with tiny corner snipped). Pipe jagged lines for hair. Add black jimmies for texture, if using. Press on candy eyeballs and draw a stitched smile with black icing or black melts
- Spiders (4): Spread melted white candy melts over the top of each Rice Krispies treat. Transfer melted black melts to a piping bag fitted with a Wilton #3 tip (or a zip-top bag with a tiny corner snipped). Pipe 3–4 straight lines down the treat. Connect with slightly curved lines between each section to form a web. Press on a mini Oreo wafer half, attach eyes with a dab of melts, then pipe 2-3 legs on each side extending onto the square.
- Monster Eyes (4): Spread melted orange or purple candy melts (or tinted white melts) across the top of each Rice Krispies treat. Add assorted eyeball candy.
Save this Recipe!
Notes
Scaling: Decorate 4 squares of each design. To make all 16 in one style, multiply that design's toppings by 4.
Make ahead: Decorate the squares a day in advance, then cover and store until serving.
Storage: Airtight at room temperature for up to 2 days, with parchment between layers to prevent sticking. They're safe past that; they just start drying out.
Freezing: Layer with wax paper in an airtight container and freeze for up to 6 weeks. Let them sit at room temperature for 15 minutes before serving.
Working with candy melts: Melt in short bursts, stirring between each. If they thicken, a small spoonful of coconut oil loosens them- the same trick I use on my Halloween pretzel rods. White or semisweet chocolate works in their place but sets softer.
The shortcut: Store-bought Rice Krispies Treats squares decorate just as well. Skip the base recipe and start at the designs.
Set: Let the candy melts firm up at room temperature before stacking or packing.
Did you make this Recipe? Leave a comment & recipe rating below. Tag @thesassandsalt on Instagram so we can admire your masterpiece!
